Setting up SSH keys for logging into Linux
Following steps are verified in Ubuntu, CentOS, RedHat and Fedora
1. Few points about SSH keys
SSH keys provide a secure way of logging into your server and are recommended for all users. The SSH uses public-key cryptography, also known as asymmetric cryptography, which uses a key pair consisting of a public key and a private key.
If you use very strong SSH passwords, your accounts are already safe from brute force attacks. However, using public-key authentication provides many benefits when working with multiple users. Few of them are listed below
- Allow multiple developers to log in as the same system user account without sharing the account password.
- Revoke single user access without revoking access by other users.
- Make it easier for an individual user to log in to different accounts without needing to manage many different passwords.
A private key is a key that is kept secret by the SSH user on his/her client machine. The user must never reveal the private key to anyone. The compromise of the private key will allow the attacker to log into servers with the associated public key without additional authentication.
The public key is added to a special file ~/.ssh/authorized_keys by default within the user account to the remote server that you want to be able to log into with SSH. When a client attempts to authenticate using SSH keys, the server can test the client on whether they have the private key. If the client can prove that it owns the private key, a shell session is started.
When a client attempts to authenticate using SSH keys, the server can test the client on whether they have the private key. If the client can prove that it owns the private key, a shell session is started.
2. Steps to create SSH Key Pair
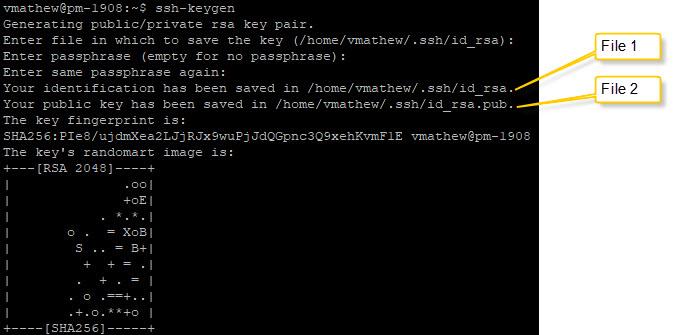
Always perform these steps with an account where SSH keys are not configured for logging in.

3. Copying Public Key in a user account in Linux
Copy the contents of ~/.ssh/id_rsa.pub (File 2) that we created to the user's account where you want to enable SSH Key-Based Authentication.
In the following section, vmathew is the username of the account where I created the SSH keypair and pagematics is the username of the account where I want to created the SSH based authentication.

Replace pagematics, with the username of the Linux account where you want to enable SSH based authentication.
The server is now ready to access SSH key based authentication on this account.
4. Log in to a Linux server with an SSH private key using Putty from Windows
4.1 Save or download your private SSH key
Save or download your private SSH key /your_home/.ssh/id_rsa (file 1) to a text file in the local Windows machine.
4.2 Load your SSH private key in PuTTY Key Generator
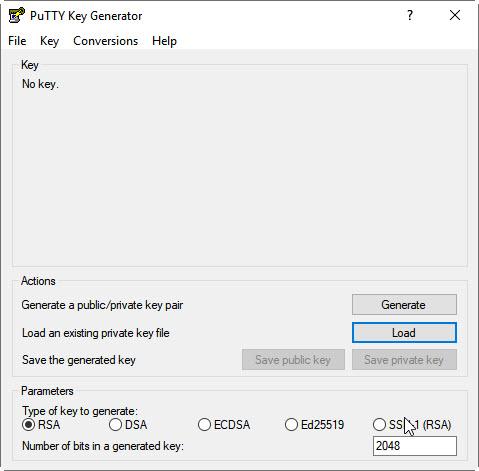
4.2.1 Open PuTTYgen tool
From the Putty Key Generator tool, click Load from the Actions section to load the existing private key file. Change the file type to search for to All Files.

4.2.2 Select the key that you saved

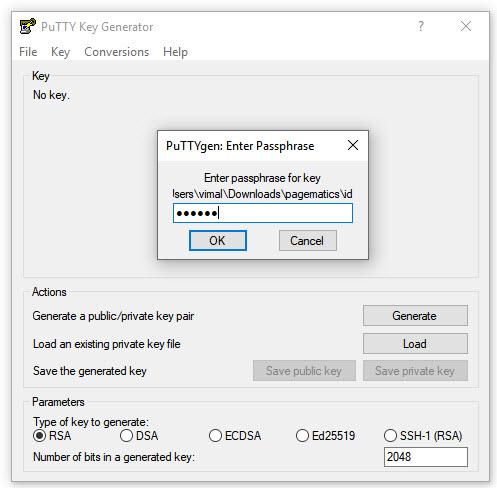
4.2.3 Enter the passphrase for key

A confirmation displays after PuTTYgen successfully imports the private key. Click OK to dismiss the message.
Enter a unique key passphrase in the Key passphrase field, then enter the same passphrase again in the Confirm passphrase field. You are prompted for this passphrase whenever you log in to a server by using your SSH private key.
Step 3: Save the private key
Click Save private key, then enter a file name in the Save private key as dialog box to save it for use with PuTTY.

4.3 Log in to PuTTY by using your SSH private key from Windows
A. Launch Putty
B. Enter a name for the Saved Sessions and type IP or hostname under Host Name (or IP Address)
From the left navigation pane;
C. Click Connection > SSH > Auth
D. Browse under Private key file for authentication
E. Navigate to the location and select SSH private key file and click Open.

F. Click Session in the left navigation pane, then click Save.

Click Open to begin your session with the server.
If you saved your SSH private key with a passphrase, enter that passphrase. An alert display indicating that the server's host is not cached on the first-time login. Click Yes to continue the connection.


Post a comment